poniedziałek, 9 lutego 2015

"Spark Coil" Induction coil - restoration project.


My induction coil-restoration project


That's me and the Coil after restoration :)


This is one of the best "X-ray" pictures of induction coil ,showing the internal pars and the way parts was connected together,this can give you easy understanding of what is going on inside the coil!
Now you know what it is made of  so it will be much easer for you to understand the restoration project and what I did to make it good as new!


That's how the coil was look like when I got it ,I place 9V Duracell battery on the left conner so you can see how large the coil is :

Here are some more pictures of what need be repair and restore before the coil can spark again:

You can see that breaker-contractor needs a lot of attention before it can back to life I have to admit that it took me so many hours to fix it and then polish it to make as new .


Those few photos shown how badly bend was the cast iron but it was to risky to try to straighten it and I found later that it didn't affect the operation of the coil.


Broken bakelite pieces was easy to glue it back together in fact it went so well that it is difficult to see where the crack was.

 
That is the bottom of  my induction coil ,you can see that the leather and all stitches are in tact need no repairs . After resistance tests I find out that wiring on  both coils was just as new which make my restoration project much easer and much cheaper :) Just to give you example : to wound secondary coil we will need approximately few miles of very fine enamelled wire.  


Internal parts of my induction coil, in fact it is only one part :capacitor and few wires:

           That's few pictures before and after ,that was one of the most time consuming part of the project and it took me around 35h to make it high quality finish ,this job was involving:carpentry,varnishing,sanding etc:


                                         Manufactures plaque : Cox-Cavendish Electrical
                                                                              Maryleone High Street 
                                                                              London

In my opinion they build it fantastic scientific instruments and for that reason I decide to restore manufactures plaque , it look almost same as new.

Here is one of the way to use your induction coil by connecting high voltage electrodes to Crookes tube and observe/study this wonderful phenomena.


Schematic of standard induction coil :


Some more photos from before and after the restoration:


My coil after restoration: 

This blog is in constant modernisation but you are more then welcome to post comments and share your opinions.

sobota, 8 listopada 2014

Restoring Ruhmkorff induction coil.


Restoring Ruhmkorff induction coil. 


     This post is dedicated to any one who would like to learn how to restore Induction Coil.
This restoration I base on my new coil which I was lucky to buy from eBay.
It is over 60 years old Ruhmkorff coil ,which use to be used in local University to demonstrate 
electromagnetic induction .
     This coil has some think special to it, it was made in the same day and the same month I was born
24.06 but many decades earlier .
When I bought it ,it was badly neglected , and needed urgent attention and the coil didn't produce any sparks what so ever. 
The next think to do was take the coil apart and dismantle it piece by piece.
That was first step to my small restoration project :) "Ruhmkorff Coil" 


First steps:
Clean all brass and metal pieces with wool wire and then polish them with brass polish.
Just to polish every single piece include:nuts,bolts it took me few long evenings but with this restoration there was no short cuts every metal piece must have mirror shine :)


Gently restore wooden base:
After removing few years old dust from the base I could see that it wasn't to damage so I decide to give it gentle restoration with scratch removal and finish of with special oil.
On photo below you can see left half base cleaned up and right side unrestored.


Polish every single brass piece :
That was most time consuming part of the restoration but give me lots of pleasure to make all the small bits of metal shine back again.Every bit was polish only by hand!
But the end effect was worth the effort :) 


Left photo show brass parts before restoration and the left after polishing. Despite my best effort 
this picture can't show how much it shine, in every piece I can see my self :)

Shine on !


Photo below show internal parts of my Ruhmkorff coil:
-0.5mF Capacitor 
-few connectors 
Unfortunately capacitor was to old :) to be use again,by the way it is one of the most important parts of this scientific instrument. There was no other way to fix it but replace it.


They are just examples of caps which I used to find the best one because I couldn't find direct replacement for 0.5mF 250V DC so I need to improvise.


With the right capacitor and all parts in palace I could finely connect power supply and please my eye with some wonderful sparks and luminous effects :) 


One more time just to remind how the scientific instrument was look before and after 
RESTORATION :) 


Video of my working Ruhmkorff coil:


Regards


poniedziałek, 20 października 2014

High Voltage Power Supply

    How to  do: High Voltage Power Supply

This my tutorial on how to make HV power supply which you can use  for any of your projects including Lifters/Ioncrafts , Tesla Coli or any other 
scientific experiments requiring HV power supply. 


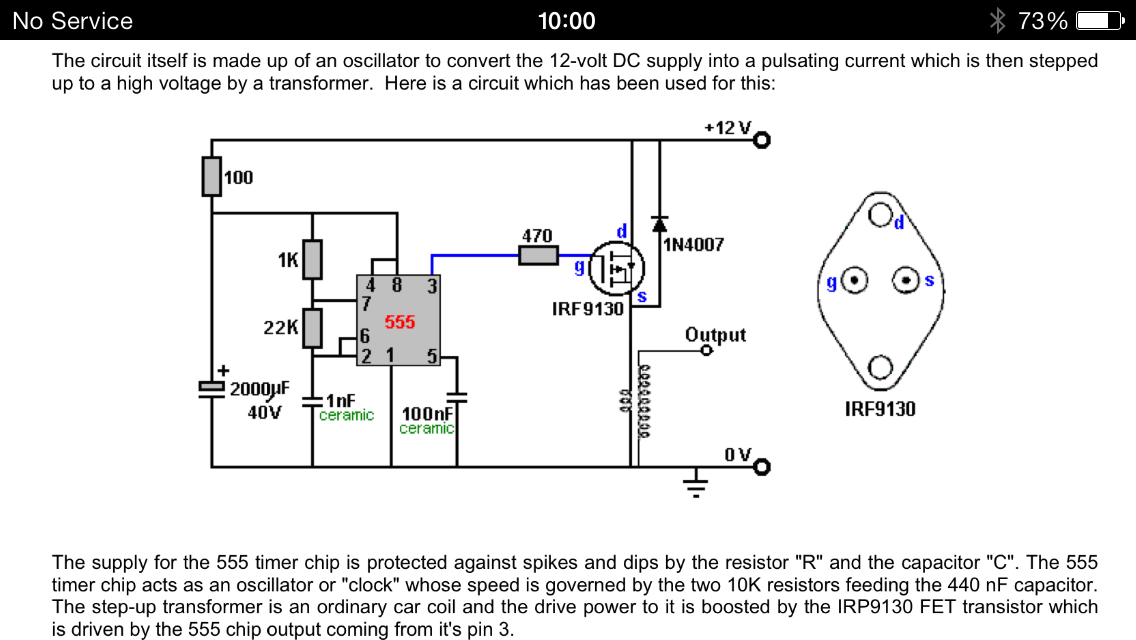
    This is the schematic which I will use in this project:


    It is easy to see on picture above which parts do you need to build it so I believe we dont need      parts list ,but what I want to add that all the components you can get for FREE
  if you have access to old TV or old electronic scrap which you can take a part.


I choose to etch my circuit board just because it look nice but you don't have to if you don't know how or you simply don't want to . Instead you can use wires and solder all together which will make the job whole easier .  


Now we get to part where we can put all components together ,as you can see on the begin I use short test wires/jump leads to make sure we have done every think as it should be.


Most important element of this High Voltage power supply is "flyback" which you can find in any old TV , this unit will work for us as High Voltage transformer and it can produce around 
 26,000 Volts :)


Now we have to just connect our circuit board with high voltage transformer and insert(if you want) it in nice box .Plastic or wooden will do just fine but you cant use any metal ones because that will make the whole job almost impossible and very danger and difficult. 


The bottom photo shown my HV power supply working and sparking :)


For more amazing High Voltage projects visit :
High Voltage Experiments